m (Fixed the instances of "giant" to "Giant") |
AlternateRT (talk | contribs) mNo edit summary Tag: Source edit |
||
| (38 intermediate revisions by 12 users not shown) | |||
| Line 1: | Line 1: | ||
| + | {{EnemyInfobox |
||
| − | {{Stub|missing dialogue}} |
||
| − | {{Infobox |
||
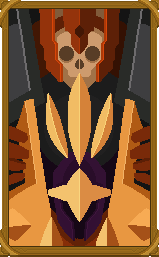
| name = The Giant |
| name = The Giant |
||
| image = The Giant.png |
| image = The Giant.png |
||
| location = [[Guardian's Haven]] |
| location = [[Guardian's Haven]] |
||
| − | | reward = |
+ | | reward = {{Item|Giantkiller}}{{DLC|RotG}} (1st kill) |
| − | + | {{Item|Giant Whistle}}{{DLC|RotG}} (3rd kill) |
|
| − | 5< |
+ | 5<sup>th</sup> [[File:Boss Stem Cell Icon.png|x18px|link=]] [[Boss Stem Cell]] (only on 4 [[BSC]]) |
| − | 5 [[Outfits|Giant Outfits]] (1 for each BSC difficulty) |
+ | 5 [[Outfits#Classic Giant Outfit|Giant Outfits]] (1 for each [[BSC]] difficulty) |
| − | | related = [[Skeleton]] |
+ | | related = [[Skeleton]]{{DLC|RotG}} |
}} |
}} |
||
| + | {{Quote|You... |
||
| − | '''The Giant''' is the fifth boss in ''Dead Cells'', added in the ''Rise of the Giant'' update. His skeleton rests in the [[Prisoners' Quarters|The Prisoners' Quarters]] until the player beats the [[The Hand of the King|Hand of the King]]. |
||
| + | ARE AN INCORRIGIBLE ASS!}} |
||
| + | '''The Giant''' is a special tier 2 [[boss]] in the game. He is encountered in [[Guardian's Haven]]{{DLC|RotG}}, the paths of which are unlocked by opening the gate to the [[Cavern]]{{DLC|RotG}} in the [[Graveyard]] (requires {{Pickup|Cavern Key}}{{DLC|RotG}}). |
||
| ⚫ | |||
| ⚫ | His skeleton rests in the [[Prisoners' Quarters]] until the player beats the [[The Hand of the King|Hand of the King]]. Once awakened, he busts down the door after the starting items, where the {{Pickup|Cavern Key}}{{DLC|RotG}} can be found. If the player follows him, a small cutscene will play, then a key can be found to permanently unlock the [[Cavern]]{{DLC|RotG}} entrance from the [[Graveyard]]. The {{Pickup|Cavern Key}}{{DLC|RotG}} must be used on the door for it to remain open. |
||
| − | His boss fight is found in the [[Guardian's Haven]], reached from the [[Cavern]] or from a 2+ [[Boss Stem Cell|BSC]] door in the [[Forgotten Sepulcher]]. |
||
| + | Requires the ''[[Rise of the Giant DLC]]''. |
||
| ⚫ | |||
| ⚫ | |||
| ⚫ | |||
=== First phase === |
=== First phase === |
||
| ⚫ | |||
| + | |||
{{MovelistTable/Start}} |
{{MovelistTable/Start}} |
||
{{MovelistTable |
{{MovelistTable |
||
| name = Charge |
| name = Charge |
||
| − | | description = |
+ | | description = The Giant clenches one of his fists and charges it, causing one of the three stripes on that side's pauldron to light up. |
| notes = |
| notes = |
||
*Destroying the charging fist before it finishes interrupts the charging. |
*Destroying the charging fist before it finishes interrupts the charging. |
||
| Line 33: | Line 35: | ||
{{MovelistTable |
{{MovelistTable |
||
| name = Punch |
| name = Punch |
||
| − | | description = |
+ | | description = The Giant lifts up one fist to the side of the arena and punches across the entire arena. The fist does high damage and pushes the player into the lava when hit. |
| notes = |
| notes = |
||
| − | * Can be blocked, parried, and dodge rolled. |
+ | * Can be blocked, {{color|parried}}, and dodge rolled. |
** Parrying stops the fists completely. |
** Parrying stops the fists completely. |
||
| showcase = |
| showcase = |
||
| Line 41: | Line 43: | ||
{{MovelistTable |
{{MovelistTable |
||
| name = Energy salvo |
| name = Energy salvo |
||
| − | | description = The Giant puts down his fists on the ground and opens one of them. From this hand he shoots out energy orbs in different patterns. |
+ | | description = The Giant puts down his fists on the ground and opens one of them. From this hand, he shoots out energy orbs in different patterns. |
| notes = |
| notes = |
||
| − | * Can be blocked, parried, and dodge rolled. |
+ | * Can be blocked, {{color|parried}}, and dodge rolled. |
** Parrying the energy orbs sends back a projectile. |
** Parrying the energy orbs sends back a projectile. |
||
| showcase = |
| showcase = |
||
| Line 49: | Line 51: | ||
{{MovelistTable |
{{MovelistTable |
||
| name = Slam fist |
| name = Slam fist |
||
| − | | description = |
+ | | description = The Giant raises a clenched fist and follow the player with it. After a few seconds slams the fist into the ground. A wave of fire then erupts and moves towards the sides of the arena upon impact. |
| notes = |
| notes = |
||
* Can be blocked and dodge rolled. |
* Can be blocked and dodge rolled. |
||
| Line 71: | Line 73: | ||
{{MovelistTable |
{{MovelistTable |
||
| name = Eye lasers |
| name = Eye lasers |
||
| − | | description = |
+ | | description = The Giant fires a laser from each eye to the side of the arena that moves inwards and traps the player in the middle of the arena. |
| notes = |
| notes = |
||
| − | * Often used in combination with '''Energy |
+ | * Often used in combination with '''Energy Salvo'''. |
| ⚫ | |||
| ⚫ | |||
| ⚫ | |||
| ⚫ | |||
| ⚫ | |||
| ⚫ | |||
| ⚫ | |||
| showcase = |
| showcase = |
||
}} |
}} |
||
{{MovelistTable |
{{MovelistTable |
||
| name = Roar |
| name = Roar |
||
| − | | description = At 50% HP the Giant will stop any attack and roar, pushing the player back. This will start the third phase. |
+ | | description = At 50% HP the Giant will stop any attack and roar, pushing the player back. This will start the third phase of the fight. |
| notes = |
| notes = |
||
* Will interrupt any attack that it may be performing. |
* Will interrupt any attack that it may be performing. |
||
| Line 99: | Line 94: | ||
{{MovelistTable |
{{MovelistTable |
||
| name = Double slam fist |
| name = Double slam fist |
||
| − | | description = |
+ | | description = The Giant raises both fists together at the center of the arena and, after a pause, slams the fists into the ground. Fire erupts from the center and moves towards the sides of the arena upon impact. This attack triggers the '''crystal collapse''' attack. |
| − | | notes = |
+ | | notes = |
* Can be blocked and dodge rolled. |
* Can be blocked and dodge rolled. |
||
** Fire can be jumped over. |
** Fire can be jumped over. |
||
| ⚫ | |||
| ⚫ | |||
| ⚫ | |||
| ⚫ | |||
| ⚫ | |||
| ⚫ | |||
| ⚫ | |||
| showcase = |
| showcase = |
||
}} |
}} |
||
| Line 114: | Line 116: | ||
{{MovelistTable/Start}} |
{{MovelistTable/Start}} |
||
{{MovelistTable |
{{MovelistTable |
||
| − | | name = |
+ | | name = Multi slam fist |
| − | | description = |
+ | | description = The Giant raises up his left fist at the far right side of the arena. He then slams down the fist six times in rapid succession, each time raising and inching his fist to the left with the 6th slam being performed at the far left edge of the arena. A wave of fire erupts and moves towards the sides of the arena upon each impact with the ground. |
| notes = |
| notes = |
||
* Can be blocked and dodge rolled. |
* Can be blocked and dodge rolled. |
||
** Fire can be jumped over. |
** Fire can be jumped over. |
||
| − | * Is performed by the left fist. |
||
| showcase = |
| showcase = |
||
}} |
}} |
||
{{MovelistTable |
{{MovelistTable |
||
| name = Energy volley |
| name = Energy volley |
||
| − | | description = |
+ | | description = The Giant raises up his right fist over his shoulder and charges it. After charging fires volleys of energy orbs in a sun pattern. |
| notes = |
| notes = |
||
| − | * Can be blocked, parried, and dodge rolled. |
+ | * Can be blocked, {{color|parried}}, and dodge rolled. |
** Parrying energy orbs sends back a projectile. |
** Parrying energy orbs sends back a projectile. |
||
| + | |||
| − | * Is performed by the right fist. |
||
| showcase = |
| showcase = |
||
}} |
}} |
||
| Line 135: | Line 136: | ||
== Strategy == |
== Strategy == |
||
=== Damaging the Giant === |
=== Damaging the Giant === |
||
| − | * The Giant can only be damaged when one of its eyes is out. |
+ | * The Giant can only be damaged when one of its eyes is out. If a fist's health has been depleted, it will fall to the ground and the eye on that side will pop out of the Giant's skull. The eye stays for 3 seconds. |
| − | ** While the eye is out the other fist cannot be damaged. |
+ | ** While the eye is out the other fist cannot be damaged. The Giant cannot perform any other attacks but crystals will keep falling from the ceiling if they already are. |
| − | ** While the eye is out the Giant cannot perform any other attacks but crystal will keep falling from the ceiling. |
||
* There is no preferred order in which to destroy the fists but alternating is a good strategy to prevent the fists from reaching max charge. |
* There is no preferred order in which to destroy the fists but alternating is a good strategy to prevent the fists from reaching max charge. |
||
| − | === Vulnerabilities and |
+ | === Vulnerabilities and immunities === |
| − | * Networking ensures that the player can damage both fists at a decent rate just by attacking 1 of them. |
+ | * {{Mutation|Networking}} ensures that the player can damage both fists at a decent rate just by attacking 1 of them. |
| − | * |
+ | * Destroying a fist during an attack will interrupt that attack completely. |
| − | * Neither the fists nor eyes have a back or a front, making |
+ | * Neither the fists nor eyes have a back or a front, making {{Item|Assassin's Dagger}} and {{Item|Vorpan}} ineffective choices. |
| − | ** However, all the entities are counted as bosses. If you have the |
+ | ** However, all the entities are counted as bosses. If you have the {{Item|Giantkiller}}{{DLC|RotG}}, it will deal critical blows constantly and The Giant will take massive damage easily. |
| − | * The |
+ | * The Giant is immune to controlling effects such as {{color|freeze}}, {{color|root}} and stun. Damage-over-time effects work normally. |
| − | ** The same is for its eyes. |
||
| − | *** They can be damaged by DoT effect which is quite effective and keeps damaging them even when out of reach of melee attacks. |
||
=== Primary attacks === |
=== Primary attacks === |
||
| − | |||
'''Charge''' |
'''Charge''' |
||
| − | * The fist can still be damaged when charging and destroying it before it completes charging interrupts the charge. |
+ | * The fist can still be damaged when charging and destroying it before it completes charging interrupts the charge and decreases it by 1. |
| − | ** Killing a fist will also uncharge the fist by 1. |
||
'''Punch''' |
'''Punch''' |
||
| − | * Best strategy to deal with this attack is to parry it. |
+ | * Best strategy to deal with this attack is to {{color|parry}} it. Dodge rolling requires precise timing and jumping over it is impossible. |
| − | ** Blocking can be done but the attack will push you |
+ | ** Blocking can be done but the attack will push you off the side of the arena into the lava. |
'''Energy salvo''' |
'''Energy salvo''' |
||
| − | * The patterns of the energy orb salvos |
+ | * The patterns of the energy orb salvos allow the player to dodge them by jumping or ducking but require precise timing. |
| − | * Parrying the orbs is easier and more effective, each orb parried could trigger a shields parry effect. |
+ | * Parrying the orbs is easier and more effective, each orb {{color|parried}} could trigger a shields parry effect. |
| − | ** Each orb parried sends back a projectile which can deal massive damage to the fists. |
+ | ** Each orb {{color|parried}} sends back a projectile which can deal massive damage to the fists. |
'''Slam fist''' |
'''Slam fist''' |
||
| − | * The fist follows the player around before slamming down |
+ | * The fist follows the player around before slamming down. Walk around baiting the fist until it stops moving, then double jump and dodge roll as needed to avoid the slam and fire. |
'''Eye laser''' |
'''Eye laser''' |
||
* The lasers always start at the outside of the arena and move slowly inwards so immediately moving to the center of the arena is the best strategy. |
* The lasers always start at the outside of the arena and move slowly inwards so immediately moving to the center of the arena is the best strategy. |
||
** The center of the arena is also the best place to deal with '''Energy Salvo''' which is always used in combination with this attack in the second and third phase. |
** The center of the arena is also the best place to deal with '''Energy Salvo''' which is always used in combination with this attack in the second and third phase. |
||
| + | ** Both lasers deal damage when touched, but if the lasers are dodge rolled, then they simply behave like walls and contact with the beams in this manner will not cause any damage. |
||
| + | *** If the lasers have stopped moving at the center of the arena, dodge rolling into it and maintaining contact while not moving forward will prevent any damage from being dealt. This allows successive dodge rolls to be done in place. |
||
| + | *** Dodge rolling to a still moving laser and touching it will cause the roll to be blocked before shortly dealing damage. This is because the laser is still moving after the roll ended. |
||
'''Crystal collapse''' |
'''Crystal collapse''' |
||
| − | * The crystals cannot be parried, but can be blocked and dodge rolled. Keep track of them while moving and avoid standing beneath them. |
+ | * The crystals cannot be {{color|parried}}, but can be blocked and dodge rolled. Keep track of them while moving and avoid standing beneath them. |
| − | ** The damage taken from the crystals can be lowered with the use of |
+ | ** The damage taken from the crystals can be lowered with the use of {{Mutation|Masochist}}. |
=== Charged attacks === |
=== Charged attacks === |
||
The best strategy is to prevent the fists from reaching max charge. Kill the fists to reduce their charge by 1. |
The best strategy is to prevent the fists from reaching max charge. Kill the fists to reduce their charge by 1. |
||
| − | ''' |
+ | '''Multi slam fist''' |
| + | * Prepare to evade one of the slams and move to the right side of the arena to avoid the rest of the slams. Alternatively, move to the left edge and only prepare to evade the final 6th slam, all while jumping over the waves of approaching flames. |
||
| − | * Same as '''Slam fist''' walk around baiting the fist and wait until it slams down to double jump and dodge roll to evade the attacks. |
||
| + | ** A single jump is sufficient to avoid one wave of fire. |
||
| − | ** More precise timing is required here because the slam is performed |
+ | ** More precise timing is required here because the slam is performed six times in rapid succession. |
'''Energy volley''' |
'''Energy volley''' |
||
| − | * The energy orbs can be blocked, parried and dodge |
+ | * The energy orbs can be blocked, {{color|parried}} and dodge rolled, but its random pattern will make dodging them very hard. |
| − | * Parrying the orbs is easier and more effective, each orb parried could trigger |
+ | * Parrying the orbs is easier and more effective, each orb {{color|parried}} could trigger the [[Shields|shield]]'s {{color|parry}} effect. |
| − | ** Each orb parried sends back a projectile which can deal massive damage to the fists. |
+ | ** Each orb {{color|parried}} sends back a projectile which can deal massive damage to the fists. |
=== Weapons/Skills === |
=== Weapons/Skills === |
||
| − | * Because all entities count as bosses the |
+ | * Because all entities count as bosses, the {{Item|Giantkiller}}{{DLC|RotG}} is an effective weapon, since it deals critical hits with each strike. |
* Any weapon or skill that can do AoE damage is effective as it can damage both fists at the same time. |
* Any weapon or skill that can do AoE damage is effective as it can damage both fists at the same time. |
||
* Any DoT effect can be used to keep dealing damage to the fists when they are out of reach for the player. |
* Any DoT effect can be used to keep dealing damage to the fists when they are out of reach for the player. |
||
| − | * Because the eye stays out a set amount of time skills like the |
+ | * Because the eye stays out a set amount of time skills like the {{Item|Powerful Grenade}} that deal big bursts of damage are very effective. |
| − | * |
+ | * The {{Item|Double Crossb-o-matic}} can attack both fists at the same time as it fires projectiles in both directions. |
| − | * |
+ | * Traps and skills that auto-aim at the enemy like the {{Item|Tesla Coil}} and {{Item|Great Owl of War}} can reach the fists when they would be out of reach for the player. |
| − | * |
+ | * The {{Item|Magic Missiles}}{{DLC|RotG}} and {{Item|Electric Whip}} are some of the ranged weapons which auto-aim at any available target even when it is directly above the player. |
| − | * |
+ | * {{Item|Wave of Denial}} can be used to deflect the falling crystals but this requires some precise timing when the crystals are very close to the player. |
| − | * |
+ | * The {{Item|Parry Shield}} gives bonus damage to returned attacks. |
| − | ** |
+ | ** {{Mutation|Spite}} also gives a bonus to returned attacks. This alone is very useful with any shield but in combination with the {{Item|Parry Shield}}, it can destroy the fists extremely fast. |
| − | * Any shield that has an effect on parry like |
+ | * Any shield that has an effect on {{color|parry}} like {{Item|Punishment}} or {{Item|Bloodthirsty Shield}} is useful because almost all attacks can be {{color|parried}}. |
| − | ** Each orb can be parried so during '''Energy |
+ | ** Each orb can be {{color|parried}} so during '''Energy Salvo''' or '''Energy Volley''' damage or DoT stacks can be applied very quickly. |
| + | * {{Item|Lightspeed}} can be used to escape entrapment by the eye lasers, if needed. |
||
== Lore == |
== Lore == |
||
| − | The Giant was in the Royal Guard, indicated by the huge painting in [[High Peak Castle]] depicting him under the [[King]]'s banner. His duty was to guard the gates of the Castle.<ref>''[https://gfycat.com/AptThunderousBagworm "The Giant who was watching the castle gates is no more. What happened between him and the King, I wonder? ...I don't know what the Giant did, but judging by the spear, they must've had quite the... difference of opinion."]''</ref> He |
+ | The Giant was in the Royal Guard, indicated by the huge painting in [[High Peak Castle]] depicting him under the [[The King|King]]'s banner. His duty was to guard the gates of the [[High Peak Castle|Castle]].<ref>''[https://gfycat.com/AptThunderousBagworm "The Giant who was watching the castle gates is no more. What happened between him and the King, I wonder? ...I don't know what the Giant did, but judging by the spear, they must've had quite the... difference of opinion."]''</ref> He and the [[Hand of the King]] shared a mutual dislike and disagreement with each other. However, they both do agree that nobody likes the [[The Alchemist|Alchemist]]. |
| − | ''"The Giant didn't like the Hand of the King, and the Hand of the King didn't like the Giant. But they did agree on one point: nobody liked the Alchemist."'' |
+ | ''"The Giant didn't like the [[Hand of the King]], and the Hand of the King didn't like the Giant. But they did agree on one point: nobody liked the [[The Alchemist|Alchemist]]."'' |
| − | During the [[Malaise]] epidemic, the Giant warned the King that his methods would lead the island to its ruin. In response, the King had his men kill the Giant with a spear and dump his corpse in the [[Prisoners' Quarters]], which explains the huge skeleton lying there. While the King gave instructions to make sure the Giant would never rise again<ref>''[https://gfycat.com/DefiniteApprehensiveAfricancivet |
+ | During the [[Malaise]] epidemic, the Giant warned the [[The King|King]] that his methods would lead the island to its ruin. In response, the King had his men kill the Giant with a spear and dump his corpse in the [[Prisoners' Quarters]], which explains the huge skeleton lying there. While the King gave instructions to make sure the Giant would never rise again<ref>''[https://gfycat.com/DefiniteApprehensiveAfricancivet "The Giant is not a member of the royal guard anymore. Take his body to the prison. A spear in his body should be enough, but make sure he never wakes up."]''</ref>, beating the Hand of the King for the first time reawakens the Giant. Upon seeing the skeleton's absence, the [[The Beheaded|Beheaded]] remarks: "Where the hell has old bones gone?" |
| + | {{SpoilerTag |
||
| − | When reaching the Giant for the first time, he reveals the Beheaded as the former King, his body lost to the Malaise. The Giant thinks poorly of the Beheaded as he recalls The King's actions, but still respects his title. |
+ | |When reaching the Giant for the first time, he reveals the Beheaded as the former [[The King|King]], his body lost to the Malaise. The Giant thinks poorly of the Beheaded as he recalls The King's actions, but still respects his title. |
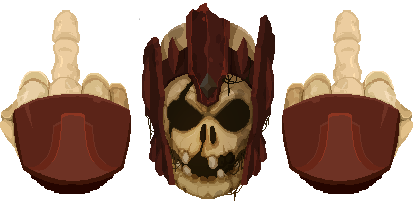
When defeated, the Giant again expresses his frustration and disappointment with the King's actions, then sinks in the lava while calling him "an incorrigible ass" and giving him the middle finger. The Beheaded returns the gesture. |
When defeated, the Giant again expresses his frustration and disappointment with the King's actions, then sinks in the lava while calling him "an incorrigible ass" and giving him the middle finger. The Beheaded returns the gesture. |
||
| − | + | Defeating him on 4 BSC for the first time triggers a different dialogue where the Giant admits that he was defeated fairly. He gives the 5<sup>th</sup> [[Boss Stem Cell]] to the player, noting that it might be of more use to him, then his head explodes before he can finish his sentence. This cutscene cannot be seen again once the 5<sup>th</sup> Boss Stem Cell is absorbed. |
|
The Beheaded doesn't seem to be able to understand the Giant's speech as he is unaware that he is the King. |
The Beheaded doesn't seem to be able to understand the Giant's speech as he is unaware that he is the King. |
||
| + | }} |
||
| + | |||
| + | == Dialogue == |
||
| + | === Intro === |
||
| + | * "''You... here?''" |
||
| + | * "''The [[Malaise]] has really had its way with you.''" |
||
| + | * "''Yes indeed.''" |
||
| + | * "''In keeping with your arrogance!''" |
||
| + | * "''Which has brought nothing but ruin on the Kingdom!''" |
||
| + | * "''In spite of all my warnings...''" |
||
| + | * "''Not a shred of hope is left to us.''" |
||
| + | * "''DIE!''" |
||
| + | |||
| + | === Outro === |
||
| + | {{SpoilerTag |
||
| + | |* "''You were a model for all of us...''" |
||
| + | * "''What drove you to all this destruction?''" |
||
| + | * "''You've even managed to destroy your own body...''" |
||
| + | * "''My [[The King|King]]...''" |
||
| + | * "''You...''" |
||
| + | * "''ARE AN INCORRIGIBLE ASS!''" |
||
| + | }} |
||
| + | |||
| + | === 4 [[BSC]] first win outro === |
||
| + | * "''You've beaten me fairly...''" |
||
| + | * "''Not like before...''" |
||
| + | * "''Take this, it might be of more use to you...''" |
||
| + | * "''Make a wish...''" |
||
| + | * "''I jest... You most certainly are a''" |
||
== Trivia == |
== Trivia == |
||
| − | * The Giant is basically a skeleton wearing heavy armor. However, parts of his |
+ | * The Giant is basically a skeleton wearing heavy armor. However, parts of his face are animate for unknown reasons. |
| + | * He wears a crystal on his forehead identical to the one on the King's chest. |
||
| + | ** When reaching the Giant with 4 [[BSC]] active, the crystal glows orange. |
||
* By size, he is the biggest boss in the entire game. |
* By size, he is the biggest boss in the entire game. |
||
** He is also the first boss to employ a unique fighting mechanic, namely composing of multiple high-health units and requiring the player to defeat one of them in order to damage other ones. |
** He is also the first boss to employ a unique fighting mechanic, namely composing of multiple high-health units and requiring the player to defeat one of them in order to damage other ones. |
||
| + | * The Giant himself, his fists, and eyes are all listed as separate entities if the player accesses their enemy information from the [[The Scribe|Scribe]]. There, a few more things are revealed about him: |
||
| − | |||
| − | * |
+ | ** His hands, eye, and his background entity are all separate entities and are listed as such. |
| − | ** His hands, eye and his background entity are all separate entities and are listed as such. |
||
** They all share the same kill counter, regardless of how many times were his fists disabled. |
** They all share the same kill counter, regardless of how many times were his fists disabled. |
||
| + | *** His hands will have double the kill count as himself or his eyes. |
||
| − | ** If the player loses to the Giant in a fight, the game will always register that his hands defeated them, unless the attack came from his eyes. |
+ | ** If the player loses to the Giant in a fight, the game will always register that his hands defeated them, unless the attack came from his eyes. |
| + | * In ''[[Version 1.2|v1.2]]'', if the player parried and killed a hand while the Giant was performing a punch, then they would deal a little damage to the Giant and the parried hand's health immediately resets to full health. |
||
== Gallery == |
== Gallery == |
||
<gallery widths="320" heights="180"> |
<gallery widths="320" heights="180"> |
||
| − | File:Giantpainting.png| |
+ | File:Giantpainting.png|A painting of the Giant and the [[Hand of the King]] in a lore room of the [[High Peak Castle|Castle]] |
File:Giant Flip Off.png|The Giant flipping off the player |
File:Giant Flip Off.png|The Giant flipping off the player |
||
</gallery> |
</gallery> |
||
| + | |||
| + | == History == |
||
| + | {{History|1.2|Introduced.}} |
||
== References == |
== References == |
||
<references /> |
<references /> |
||
| + | |||
| + | {{Bosses Nav}} |
||
[[Category:Bosses]] |
[[Category:Bosses]] |
||
Revision as of 15:30, 9 July 2021
ARE AN INCORRIGIBLE ASS!„
The Giant is a special tier 2 boss in the game. He is encountered in Guardian's HavenRotG, the paths of which are unlocked by opening the gate to the CavernRotG in the Graveyard (requires ![]() Cavern KeyRotG).
Cavern KeyRotG).
His skeleton rests in the Prisoners' Quarters until the player beats the Hand of the King. Once awakened, he busts down the door after the starting items, where the ![]() Cavern KeyRotG can be found. If the player follows him, a small cutscene will play, then a key can be found to permanently unlock the CavernRotG entrance from the Graveyard. The
Cavern KeyRotG can be found. If the player follows him, a small cutscene will play, then a key can be found to permanently unlock the CavernRotG entrance from the Graveyard. The ![]() Cavern KeyRotG must be used on the door for it to remain open.
Cavern KeyRotG must be used on the door for it to remain open.
Requires the Rise of the Giant DLC.
Moveset
First phase
In 1+ BSC, the Giant goes straight to the second phase.
|
Charge
|
|
Punch
|
|
Energy salvo
|
|
Slam fist
|
|
Roar
|
Second phase
Retains all attacks from the previous phase.
|
Eye lasers
|
|
Roar
|
Third phase
Retains all attacks from the previous phases.
|
Double slam fist
|
|
Crystal collapse
|
Charged attacks
When the Giant has charged a fist three times without interruption it will use one of the following attacks. Which attack depends on the charged fist.
These attacks can be used in any phase.
|
Multi slam fist
|
|
Energy volley
|
Strategy
Damaging the Giant
- The Giant can only be damaged when one of its eyes is out. If a fist's health has been depleted, it will fall to the ground and the eye on that side will pop out of the Giant's skull. The eye stays for 3 seconds.
- While the eye is out the other fist cannot be damaged. The Giant cannot perform any other attacks but crystals will keep falling from the ceiling if they already are.
- There is no preferred order in which to destroy the fists but alternating is a good strategy to prevent the fists from reaching max charge.
Vulnerabilities and immunities
 Networking ensures that the player can damage both fists at a decent rate just by attacking 1 of them.
- Destroying a fist during an attack will interrupt that attack completely.
- Neither the fists nor eyes have a back or a front, making Assassin's Dagger and Vorpan ineffective choices.
- However, all the entities are counted as bosses. If you have the GiantkillerRotG, it will deal critical blows constantly and The Giant will take massive damage easily.
- However, all the entities are counted as bosses. If you have the
- The Giant is immune to controlling effects such as freeze, root and stun. Damage-over-time effects work normally.
Primary attacks
Charge
- The fist can still be damaged when charging and destroying it before it completes charging interrupts the charge and decreases it by 1.
Punch
- Best strategy to deal with this attack is to parry it. Dodge rolling requires precise timing and jumping over it is impossible.
- Blocking can be done but the attack will push you off the side of the arena into the lava.
Energy salvo
- The patterns of the energy orb salvos allow the player to dodge them by jumping or ducking but require precise timing.
- Parrying the orbs is easier and more effective, each orb parried could trigger a shields parry effect.
- Each orb parried sends back a projectile which can deal massive damage to the fists.
Slam fist
- The fist follows the player around before slamming down. Walk around baiting the fist until it stops moving, then double jump and dodge roll as needed to avoid the slam and fire.
Eye laser
- The lasers always start at the outside of the arena and move slowly inwards so immediately moving to the center of the arena is the best strategy.
- The center of the arena is also the best place to deal with Energy Salvo which is always used in combination with this attack in the second and third phase.
- Both lasers deal damage when touched, but if the lasers are dodge rolled, then they simply behave like walls and contact with the beams in this manner will not cause any damage.
- If the lasers have stopped moving at the center of the arena, dodge rolling into it and maintaining contact while not moving forward will prevent any damage from being dealt. This allows successive dodge rolls to be done in place.
- Dodge rolling to a still moving laser and touching it will cause the roll to be blocked before shortly dealing damage. This is because the laser is still moving after the roll ended.
Crystal collapse
- The crystals cannot be parried, but can be blocked and dodge rolled. Keep track of them while moving and avoid standing beneath them.
- The damage taken from the crystals can be lowered with the use of Masochist.
- The damage taken from the crystals can be lowered with the use of
Charged attacks
The best strategy is to prevent the fists from reaching max charge. Kill the fists to reduce their charge by 1.
Multi slam fist
- Prepare to evade one of the slams and move to the right side of the arena to avoid the rest of the slams. Alternatively, move to the left edge and only prepare to evade the final 6th slam, all while jumping over the waves of approaching flames.
- A single jump is sufficient to avoid one wave of fire.
- More precise timing is required here because the slam is performed six times in rapid succession.
Energy volley
- The energy orbs can be blocked, parried and dodge rolled, but its random pattern will make dodging them very hard.
- Parrying the orbs is easier and more effective, each orb parried could trigger the shield's parry effect.
- Each orb parried sends back a projectile which can deal massive damage to the fists.
Weapons/Skills
- Because all entities count as bosses, the GiantkillerRotG is an effective weapon, since it deals critical hits with each strike.
- Any weapon or skill that can do AoE damage is effective as it can damage both fists at the same time.
- Any DoT effect can be used to keep dealing damage to the fists when they are out of reach for the player.
- Because the eye stays out a set amount of time skills like the Powerful Grenade that deal big bursts of damage are very effective.
- The Double Crossb-o-matic can attack both fists at the same time as it fires projectiles in both directions.
- Traps and skills that auto-aim at the enemy like the Tesla Coil and Great Owl of War can reach the fists when they would be out of reach for the player.
- The Magic MissilesRotG and Electric Whip are some of the ranged weapons which auto-aim at any available target even when it is directly above the player.
- Wave of Denial can be used to deflect the falling crystals but this requires some precise timing when the crystals are very close to the player.
- The Parry Shield gives bonus damage to returned attacks.
- Spite also gives a bonus to returned attacks. This alone is very useful with any shield but in combination with the Parry Shield, it can destroy the fists extremely fast.
- Any shield that has an effect on parry like Punishment or Bloodthirsty Shield is useful because almost all attacks can be parried.
- Each orb can be parried so during Energy Salvo or Energy Volley damage or DoT stacks can be applied very quickly.
- Lightspeed can be used to escape entrapment by the eye lasers, if needed.
Lore
The Giant was in the Royal Guard, indicated by the huge painting in High Peak Castle depicting him under the King's banner. His duty was to guard the gates of the Castle.[1] He and the Hand of the King shared a mutual dislike and disagreement with each other. However, they both do agree that nobody likes the Alchemist.
"The Giant didn't like the Hand of the King, and the Hand of the King didn't like the Giant. But they did agree on one point: nobody liked the Alchemist."
During the Malaise epidemic, the Giant warned the King that his methods would lead the island to its ruin. In response, the King had his men kill the Giant with a spear and dump his corpse in the Prisoners' Quarters, which explains the huge skeleton lying there. While the King gave instructions to make sure the Giant would never rise again[2], beating the Hand of the King for the first time reawakens the Giant. Upon seeing the skeleton's absence, the Beheaded remarks: "Where the hell has old bones gone?"
Dialogue
Intro
- "You... here?"
- "The Malaise has really had its way with you."
- "Yes indeed."
- "In keeping with your arrogance!"
- "Which has brought nothing but ruin on the Kingdom!"
- "In spite of all my warnings..."
- "Not a shred of hope is left to us."
- "DIE!"
Outro
4 BSC first win outro
- "You've beaten me fairly..."
- "Not like before..."
- "Take this, it might be of more use to you..."
- "Make a wish..."
- "I jest... You most certainly are a"
Trivia
- The Giant is basically a skeleton wearing heavy armor. However, parts of his face are animate for unknown reasons.
- He wears a crystal on his forehead identical to the one on the King's chest.
- When reaching the Giant with 4 BSC active, the crystal glows orange.
- By size, he is the biggest boss in the entire game.
- He is also the first boss to employ a unique fighting mechanic, namely composing of multiple high-health units and requiring the player to defeat one of them in order to damage other ones.
- The Giant himself, his fists, and eyes are all listed as separate entities if the player accesses their enemy information from the Scribe. There, a few more things are revealed about him:
- His hands, eye, and his background entity are all separate entities and are listed as such.
- They all share the same kill counter, regardless of how many times were his fists disabled.
- His hands will have double the kill count as himself or his eyes.
- If the player loses to the Giant in a fight, the game will always register that his hands defeated them, unless the attack came from his eyes.
- In v1.2, if the player parried and killed a hand while the Giant was performing a punch, then they would deal a little damage to the Giant and the parried hand's health immediately resets to full health.
Gallery
A painting of the Giant and the Hand of the King in a lore room of the Castle
The Giant flipping off the player
History
- 1.2
- .ntroduced.
References
- ↑ "The Giant who was watching the castle gates is no more. What happened between him and the King, I wonder? ...I don't know what the Giant did, but judging by the spear, they must've had quite the... difference of opinion."
- ↑ "The Giant is not a member of the royal guard anymore. Take his body to the prison. A spear in his body should be enough, but make sure he never wakes up."
Bosses
| |
|---|---|
|
|